That's some serious heat!
You are using an out of date browser. It may not display this or other websites correctly.
You should upgrade or use an alternative browser.
You should upgrade or use an alternative browser.
#ZedShed La_Vida_Diver's Blue upgrade and TLC
- Thread starter La_vida_diver
- Start date
-
- Tags
- bodywork roof suspension
Very Interesting Video, I have done this myself on exhaust manifold studs, care has to be taken as the castings are usually quit brittle and will crack. I had never thought of using candle wax though I usually use WD40 as this does the same thing. Its better to work the stud backwards and forwards as this loosens the rust and hopefully helps to retain the threads in the manifold.
Mike
Mike
No Black went to someone else a few months ago I think it was in June That is what is funding some of the refreshment of Blue.Good to Blue is getting some TLC, Do you still have Black?
Spare wheel has seen better days, and is on the list of "advisories". My that will need to be replaced with one from a recycle yard somewhere
This is the passenger rear brake disc, and clearly not getting enough action from the pads and This is the drivers rear brake disc, which clearly hasn't seen any action from the pads for some time... Car has not been used apart from to get onto the trailer since the London to Brighton and has been sat outside in a field on hardstanding so not surprised
Did I mentioned the countryside and the mud (read as s**t?). I'll try and look further down the sills tomorrow to see if this is just at the end, or all the way through them. This is all tucked up nicely behind the wheel arch liners. The ends of the sills are showing bad corrosion sadly. I know the body work is on Duncans list, so hopefully this will get sorted as part of that process
The exhaust is down! One piece system from the cats backwards, and the bolts were reasonably ok to remove without too much swearing. The lower cross brace however was a bit of a pig. Being a one piece from the cat back may explain why she has a slightly different note to other Z3 2.8's I have listened to
Good going guys. Thanks!! pretty happy that things are coming off Okish
Last edited:
First rule of Zed Shed: Every Zed is different, despite them being assembled the same way!
Got a few more piccies for you this evening from our afternoon tinkering session. First call of business was to get the sub frame dropped to the floor, and in usual fashion we got thrown a couple of curve balls. Nothing serious, just a couple of things we hadn't experienced before. Probably lost perhaps 30 minutes messing around them, but it's nice to get a bit of variety in what we do.
First issue was being able to separate the brake lines. There was some thick goopy stuff packed around the joints, and we are pretty sure it wasn't a cow by-product. Had an oily texture to it, a bit like silicone sealant but really couldn't identify it. Once that was stripped back we couldn't undo the break lines where we normally do. This time we had to remove the brake line from the back of the hub - needed a bit of extra concentration as we lowered the frame down so we didn't damage it!
The second issue was that one of the hand brake cables wouldn't pull back through the underside of the car. Tried everything, but it seemed like something was catching and stopping it coming through. Lee grabbed the pliers and started to cut through them, and while he was doing so the cable pulled through as if nothing had happened. Sods law, but it's out so who cares!
The sequence this evening was pretty standard (apart from the showering of dirt every time something moved)


This leads us on to some more pictures of a fairly graphic nature. I'm hoping Duncan doesn't mind this being a warts and all post, but this is what we have found
On the hub I took apart which had the worst condition brake disc, the pads had effectively welded themselves to the carrier. When I applied a quick tap to the to the back of the pad the lining fell off. I picked it up and it started to crumble . The passenger side wasn't much better!

The pads had to be prized out with a reasonable amount of force. There was no lateral movement in them at all, and I think this is the reason why the discs were barely being touched! Must have been front axle braking in the main.

An airfix assemble your self brake pad kit - just add glue

Close up of passenger rear brake disc.

Close up of drivers rear brake disc

On the subject of khaki coloured sub frames... Apparently it's not, it's just covered in muck! Lee gave on side a quick go with a stiff brush, and it's standard black underneath. Pics for proof")

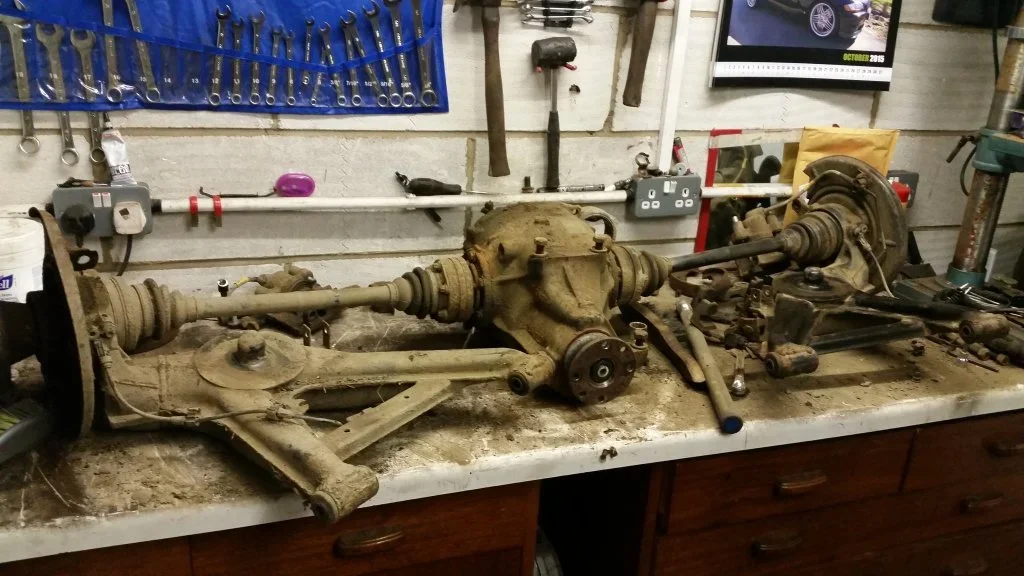
Resting on the bench, torn down ready for reassembly. Lee is going to spend some time tomorrow cleaning up some of the parts like the calipers and caliper carriers.

So now it's just waiting for parts to be ordered and arrive, and we can reassemble and refit the sub frame most likely one evening next week. We are then going to turn our attention to the front suspension.
Got a few more piccies for you this evening from our afternoon tinkering session. First call of business was to get the sub frame dropped to the floor, and in usual fashion we got thrown a couple of curve balls. Nothing serious, just a couple of things we hadn't experienced before. Probably lost perhaps 30 minutes messing around them, but it's nice to get a bit of variety in what we do.
First issue was being able to separate the brake lines. There was some thick goopy stuff packed around the joints, and we are pretty sure it wasn't a cow by-product. Had an oily texture to it, a bit like silicone sealant but really couldn't identify it. Once that was stripped back we couldn't undo the break lines where we normally do. This time we had to remove the brake line from the back of the hub - needed a bit of extra concentration as we lowered the frame down so we didn't damage it!
The second issue was that one of the hand brake cables wouldn't pull back through the underside of the car. Tried everything, but it seemed like something was catching and stopping it coming through. Lee grabbed the pliers and started to cut through them, and while he was doing so the cable pulled through as if nothing had happened. Sods law, but it's out so who cares!
The sequence this evening was pretty standard (apart from the showering of dirt every time something moved)
- Judge the best balancing point underneath the differential for easy lowering. There are a couple of different types of diffs so it's not always the same position. Balanced it perfectly tonight
- Disconnect the ARBs
- Remove the bolt through the differential bush
- Remove the heat shielding from the transmission tunnel
- Slacken off the caliper carriers and caliper bolts (makes life easier when taking them apart on the bench)
- Pull the handbrake cables through
- Unbolt the prop shaft from the differential (4 nuts)
- Disconnect the brake lines
- Remove the two plates underneath the rear beam bushes
- Undo the 22mm nuts holding the beam on to the chassis
- Lower it down slowly to the floor - this is when you know you have the frame balanced on the jack perfectly or not.
This leads us on to some more pictures of a fairly graphic nature. I'm hoping Duncan doesn't mind this being a warts and all post, but this is what we have found
On the hub I took apart which had the worst condition brake disc, the pads had effectively welded themselves to the carrier. When I applied a quick tap to the to the back of the pad the lining fell off. I picked it up and it started to crumble
. The passenger side wasn't much better!The pads had to be prized out with a reasonable amount of force. There was no lateral movement in them at all, and I think this is the reason why the discs were barely being touched! Must have been front axle braking in the main.
An airfix assemble your self brake pad kit - just add glue
Close up of passenger rear brake disc.
Close up of drivers rear brake disc
On the subject of khaki coloured sub frames... Apparently it's not, it's just covered in muck! Lee gave on side a quick go with a stiff brush, and it's standard black underneath. Pics for proof
Resting on the bench, torn down ready for reassembly. Lee is going to spend some time tomorrow cleaning up some of the parts like the calipers and caliper carriers.
So now it's just waiting for parts to be ordered and arrive, and we can reassemble and refit the sub frame most likely one evening next week. We are then going to turn our attention to the front suspension.
Attachments
Guys,
looking at the pics which as a non mechanically person is really interesting to see how the car comes apart, we cannot be too surprised at the condition as I do recall Duncan's seat bushes were in just the same condition when they were replaced lol)")
When removing the sub frame is this a 2 x man job??
I'm really looking forwards to the front suspension works as I need to replace all 4 x shocks this winter and thinking of doing this myself and having a go at some mechanical works . Please keep posting pics.
Great post, keep up the great works guys.
looking at the pics which as a non mechanically person is really interesting to see how the car comes apart, we cannot be too surprised at the condition as I do recall Duncan's seat bushes were in just the same condition when they were replaced lol
When removing the sub frame is this a 2 x man job??
I'm really looking forwards to the front suspension works as I need to replace all 4 x shocks this winter and thinking of doing this myself and having a go at some mechanical works
. Please keep posting pics.Great post, keep up the great works guys.
It's easier with two for sure, but you could with enough motivation do it on your own. You won't however be able to lift it on to a work bench on your own, it's bloody heavy! Of course you don't need it on a bench to work on, it's just much easier to do so.When removing the sub frame is this a 2 x man job??
You won't however be able to lift it on to a work bench on your own
@Nifty Fifty get yourself a fork lift......
I just loved a comment on FB about this pic.......
"What has exploded"?

"What has exploded"?
Nice one MikeI just loved a comment on FB about this pic.......
"What has exploded"?
Looks like 'er indoors has emptied her handbag
'er indoors has emptied her handbag
Ha,Ha, you can say that now you're safely back home mate.
Tony.
This leads us on to some more pictures of a fairly graphic nature. I'm hoping Duncan doesn't mind this being a warts and all post, but this is what we have found
IMHO, he must have a set on him to show this on a public forum, that 'thing' was an accident waiting to happen by the looks of it.
What we call at work low maintainace. It's amazing how quickly a car can get into a condition like that.
Tony.
Tony.
Actually the reason she was laid up since coming back from the London to Brighton was that after I had fixed the problem with the water pump failure I could tell that things were not right so she has been laid up since in the middle of a field (all be it on hard standing not mud) I also live very much in the messy countryside. If you take out the muck issues the main thing that was a safety issue was the current issue with the brakes. Most of the bushes had just gone through the MOT before the London to Brighton at which point she was handling fine. I was aware when I checked her over for London to Brighton that the Diff Bush was starting to deteriorate but at that time the brakes were "fine" from an MOT point of view but I knew things were wrong because of how Black had handled on track. I was also aware of a small leak to the front struts which is why they are already lined up to be replaced. After the L2B she was out in the weather not being used for 5 months and not under cover either on the top of a hill so I was expecting problems. It is also one of the reasons why she was trailered up to Lee and Gaz. So it was never an accident waiting to happen but it was a very DUE process to get her looked at and I had spoken to Lee and Gaz many months ago about the possibilities of it getting done.IMHO, he must have a set on him to show this on a public forum, that 'thing' was an accident waiting to happen by the looks of it.
@Lee & @GazHyde looking at the rear callipers are we looking at replacement or is all that rust well clear of the working area's? Maybe it is worth looking at the costs of replacement callipers? Give me a PM
I should also add I am very happy for this to be a warts and all display because all the work is getting done and when she is back together I will have many happy years using her in the future. The fact that I
also have major body Issues to sort as well is just one of those things I was the one that dented her and that the sills look like they need replacing is just part of the rest of this winters plans. I intend taking off all the painted panels and utilising the best from the complete spare set and what is on Blue to put the best I can back together but it would be mad without doing this process first. I did wonder about moving Blue on and replacing her but It sort of seamed a bit unfair to the car. And I like the tone of Blue's exhaust, it just appears to be a little different.

Last edited:
- Joined
- Jun 29, 2015
- Points
- 74
- Location
- Telford, Shropshire
- Model of Z
- 3.0 Roadster + *cough* MX5 project
Great thread La_Vida_Diver, also thank you for commenting on my post with the details of that roof man. That led me here and needless to say I will be giving him a call!
I think it's worthwhile you mentioning it's been laid up for some time, I didn't explain that although I knew and forgot. Also as Duncan says the car was trailered up to Basingstoke rather than being driven, so it's not in daily use.So it was never an accident waiting to happen but it was a very DUE process to get her looked at and I had spoken to Lee and Gaz many months ago about the possibilities of it getting done.
It's always tricky deciding when to pass a car on, but what I have learnt from the last year in the Zed Shed is that despite their ages the Z3 is pretty solid underneath. Replace all those failing bits of rubber, treat the corrosion and they should easily last out a long long time. Lets face it the early ones were made in 1996, and even the youngest are now 13 years old.I did wonder about moving Blue on and replacing her but It sort of seamed a bit unfair to the car.
What's being proven every time we look at one of these is that there is little you can't do to a Z3 with some room, 4 axle stands and a reasonable selection of tools. Oh, and a bit of knowledge of course - which is where Dr Lee comes in. Documenting the process like this is one of the things I like about the stuff we do, so that it hopefully gives others a bit of confidence to tackle some of these jobs themselves.
We haven't totaled up what a garage (or even a main dealer) would charge for a sub-frame refresh, but guessing it's going to be at lot just in labour terms, let alone any markup on replacement parts and the parts themselves. Then the VAT, don't forget the VAT...
Just glad being able to keep more of these awesome little cars going for a few more happy motoring miles!
I think it is important too, Though I am worried now about how much muck gets ON TOP of things like the rear beam where I live, I am building a shed to store her in out of the weather but living where I do in the mucky countryside may always be a problem.Documenting the process like this is one of the things I like about the stuff we do, so that it hopefully gives others a bit of confidence to tackle some of these jobs themselves.
IN my case a bit of a cross between Car SOS (my Hips won't let me do what I would want to myself, hope to get replacement soon) and wheeler dealers saving cars for future enjoyment.Just glad being able to keep more of these awesome little cars going for a few more happy motoring miles!
By the way Spoke to ASWR this morning and they have said they have never yet been able to supply a Z3 spare wheel they are ALL too rotten for them to be able to sell them......wow. Still looking though
Just had a few photos sent over by Lee who has had a quiet evening without me prattling in his ear all night! Tonight was a tidying up & tinkering session, and we should be on track to lift the rear beam back in tomorrow evening.
ARB mounts - before and after

PowerFlex beam bushes.

Shiny caliper carriers

and calipers

Even a slightly shiny diff - I was only joking about the metal polish the other night


Brembo discs for the rear...

and finally a comparison between the original springs fitted, and the ones Duncan had shortened. Looks to be quite a drop, and maybe too low for standard shock absorbers - but I guess we'll find out tomorrow

Oh, and all that dust and cow s*** has to go somewhere doesn't it...

ARB mounts - before and after
PowerFlex beam bushes.
Shiny caliper carriers
and calipers
Even a slightly shiny diff - I was only joking about the metal polish the other night
Brembo discs for the rear...
and finally a comparison between the original springs fitted, and the ones Duncan had shortened. Looks to be quite a drop, and maybe too low for standard shock absorbers - but I guess we'll find out tomorrow
Oh, and all that dust and cow s*** has to go somewhere doesn't it...
Wow The springs look much more different than I expected but the guy is well known for making great springs so if he says that will lower it by 20mm I believe him. I guess the remaining spring has to be stiffer to make sure things balance right. It will be interesting to see how it compares to the fronts which will use standard springs on a 20mm shortened strut I just hope it ends up balanced.
I can't express my thanks to @Lee and @GazHyde enough both for the work and being kept in touch with what is happening.
Cheers guys!
I can't express my thanks to @Lee and @GazHyde enough both for the work and being kept in touch with what is happening.
Cheers guys!
Hey Lee and Gaz, Looks like you should invest in a small Sand Blasting Cabinet. Sandblasting would see the job done in half the time and look better. Love what you guys are doing, its really good that someone is offering this service.
Just as a side issue, would you say the new Powerflex bushes you are installing will last any longer than the original ones. After all the original bushes have lasted at least 15 years and in the case of a lot of Zeds on the road now, are still doing a perfectly good job!!!
Mike
Just as a side issue, would you say the new Powerflex bushes you are installing will last any longer than the original ones. After all the original bushes have lasted at least 15 years and in the case of a lot of Zeds on the road now, are still doing a perfectly good job!!!
Mike
Hey Lee and Gaz, Looks like you should invest in a small Sand Blasting Cabinet. Sandblasting would see the job done in half the time and look better. Love what you guys are doing, its really good that someone is offering this service.
Just as a side issue, would you say the new Powerflex bushes you are installing will last any longer than the original ones. After all the original bushes have lasted at least 15 years and in the case of a lot of Zeds on the road now, are still doing a perfectly good job!!!
Mike
Morning Mike, IE sand blasting, I have a bead blaster and sand blaster I also have powder coting services but there's a limit what I will do for free. It also will take a lot more of my time doing this. This exercise is purely what can be done in a single garage at your own home.
The Powerflex bushes will outlive the originals by a long shot and stay firm, the issue with the OE type is they deteriorate gradually, when it comes to us removing the old ones I have never come across a healthy set so for all we know they could of gone years ago. (unhealthy being very soft rubber allowing the back end to wobble)
Lee